Friday, November 25, 2011

PFILE or SPFILE ..

How will I know if my database is using a PFILE or SPFILE:
Execute the following query to see if your database was started with a PFILE or SPFILE:
SELECT DECODE(value, NULL, 'PFILE', 'SPFILE') "Init File Type" FROM sys.v_$parameter WHERE name = 'spfile';


Wednesday, October 5, 2011

Oracle Database 11g Release 2 Installation Steps on Windows

In this post I will describe the installation steps of Oracle database 11g Release 2 (32-bit) on Windows Server 2003 (32-bit).
--------------------------------------
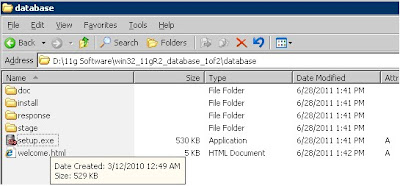
- Download Oracle Database 11g release 2.
- Run the setup.exe


- Press Run button.


Provide your email address to be informed of security issues, install the product and initiate Manager.


Select any of the following install steps.


Oracle Database 11g Release 2 introduces a new option that enables you to specify the type of system on which the database is installed. If you are installing on a laptop or a desktop, then select the Desktop Class option; otherwise, select the Server Class option to install on a server. These options are available on the System Class screen.

There is no difference in the software that gets installed after you select any one option but the Desktop Class option installs a single instance database without the advanced configuration options.


Typical install configuration.


Prequisite Checks


Installation Progress


Installation error
File not found C:\app\Administrator\Products\11.2.0\dbhome_1\oc4j\j2ee\oc4j_applications\applications\em\em.ear
File not found C:\app\Administrator\Products\11.2.0\dbhome_1\oc4j\j2ee\oc4j_applications\applications\em\em.war
File not found C:\app\Administrator\Products\11.2.0\dbhome_1\oc4j\j2ee\OC4J_DBConsole\config\system-application.xml
File not found C:\app\Administrator\Products\11.2.0\dbhome_1\oc4j\j2ee\\OC4J_DBConsole\config\system-jazn-data.xml


The above errors came because I didn't unzip the 2 files in the same folder.

Download the Oracle win32_11gR2_database_1of2.zip and win32_11gR2_database_2of2.zip unzip both files in same folder and then run the setup again.


Installation of Oracle Database was successfull.
Enterprise Manager Database Control URL - (rakesh11g)


Sql*Plus of 11g Release 2.


Friday, July 1, 2011

Deleting DISK from DISKGROUP

Lets see how we can delete an ASM disk in DISKGROUP.
Currently, we have 3 disks in DATA diskgroup.


I want to drop disk1 from DATA diskgroup.

SQL> alter diskgroup data drop disk 'D:\ASMDISKS\DISK1';
alter diskgroup data drop disk 'D:\ASMDISKS\DISK1'
*
ERROR at line 1:
ORA-15032: not all alterations performed
ORA-15054: disk "D:\ASMDISKS\DISK1" does not exist in diskgroup "DATA"


SOLUTION : ONE has to use the name that has been designated in ASM, not as we have given it as disk1.

SQL> select path,name from v$asm_disk where group_number=1;


Here, Disk1 name is DATA_0000. Alter diskgroup data drop disk DATA_0000 will work;


DISK 1 deleted.
Lets check whether DISK1 deleted or not.
select path,name from v$asm_disk where group_number=1;


The DISK1 is no more in DATA diskgroup.

Adding DISK in DISKGROUP

I have two disks, disk1 and disk2, I want to add new disk3 to diskgroup DATA.

SQL> select disk_number, name, path from v$ASM_DISK;

DISK_NUMBER NAME PATH
----------- ------------------------------ --------------------
0 DATA_0000 D:\ASMDISK\DISK1
1 DATA_0001 D:\ASMDISK\DISK2

When I execute the below command for adding disk3, i get below error.


The error :
ORA-15031: disk specification 'D:\asmdisk\disk3' matches no disk


I realized that I need to create a disk physically, then I should create the disk3 with above command.
asmtool -create d:\asmdisk\disk3 1024


SQL> alter diskgroup data add disk 'D:\asmdisk\disk3';

Diskgroup altered.


SQL> select disk_number, name, path from v$ASM_DISK;


In my Next, post I will delete disk, diskgroup from ASM.

Sunday, June 19, 2011

ASM views on ASM instance after database Installation

I have created new database with ASM based filesystem, I will execute some queries to check the result. The result will be different from my last post ASM views before database installation.

V$ASM_ALIAS: Displays a row for each alias present in every disk group mounted by the ASM instance.
SQL> select * from v$ASM_ALIAS;


V$ASM_CLIENT: Displays a row for each database instance using a disk group managed by the ASM instance.


V$ASM_DISK
: Displays a row for each disk discovered by the ASM instance, including disks which are not part of any disk group.


V$ASM_DISKGROUP: Displays a row for each disk group discovered by the ASM instance.


V$ASM_FILE: Displays a row for each file for each disk group mounted by the ASM instance.


V$ASM_OPERATION: Displays a row for each file for each long running operation executing in the ASM instance.


V$ASM_TEMPLATE: Displays a row for each template present in each disk group mounted by the ASM instance.

Thursday, June 9, 2011

Creating Database with ASM File System

I am creating database using DBCA, and specify Automatic Storage Management as FileSystem.
Welcome screen of DBCA (Database Configuration Assistant)


Step one of DBCA, Here we will select the Create a Database option.


Step three, My database name and sid is "RAKESH"


Step 6 of 13


After pressing the next button, window will prompt for sys ASM password


In next step, It will ask for the diskgroup that to be used for the Storage, As I have created only one diskgroup DATA, I will select it only.


In next step I specified the files should be OMF Files


Step 9 of 13: Flash Recovery Area,


After the successful installation of Oracle Database with ASM File system, I log in at Enterprise Manager to verify datafiles storage. On the main page of Oracle EM, I got new link for ASM instance, check below image.


After clicking on the +ASM_standby link, I was directed to a below ASM page in EM. .


Add Image
Data Files in ASM

Wednesday, June 8, 2011

ASM views on ASM Instance before database Installation.

As in my previous post ASM basic configuration I created an ASM instance, now I will execute some queries to get some more detail & get some experience on ASM instance. I have not created database yet, its simple ASM instance creation without having database instance, So queries result can be different from the one with ASM based filesystem. I will create ASM database in my next post.

A very good article has been given on ASM 10g at ORACLE-BASE website, and list of v$views has been given in this article, I will execute them at ASM instance one by one.

The ASM configuration can be viewed using the v$ASM_, which often contain different information depending on whether they are queried from the ASM instance, or a dependent database instance.


V$ASM_ALIAS : Displays a row for each alias present in every disk group mounted by the ASM instance. Here the ASM_ALIAS will not return any rows, because we have not created any database that use this ASM as filesystem.


V$ASM_CLIENT: Displays a row for each database instance using a disk group managed by the ASM instance.
As we have not created any database yet, who can use this diskgroup (data) in ASM, so query will not result any rows at this time.


V$ASM_DISK : Displays a row for each disk discovered by the ASM instance, including disks which are not part of any disk group.
As, I have created two disks, then query should return two rows for each disk.


V$ASM_DISKGROUP : Displays a row for each disk group discovered by the ASM instance.
I have created only one diskgroup DATA, query should return one row only.


V$ASM_FILE : Displays a row for each file for each disk group mounted by the ASM instance.


V$ASM_OPERATION : Displays a row for each file for each long running operation executing in the ASM instance.


V$ASM_TEMPLATE: Displays a row for each template present in each disk group mounted by the ASM instance.

Monday, June 6, 2011

ASM basic configuration at LOCAL DISK

I am writing below steps to create a ASM instance, ASM diskgroup and ASM disks on local machine, as I dont have RAW device, it will be on LOCAL DISK (NTFS) D drive, Once, the ASM instance is created, I will use DBCA to create database and specify Automatic Storage management as filesystem.
ONE:Creating disk for ASM Instance, I am creating three disk of 1GB size.

D:\>mkdir asmdisk

D:\>asmtool -create d:\asmdisk\disk1 1024

D:\>asmtool -create d:\asmdisk\disk2 1024

D:\>
I have created a folder asmdisk, and two disks each size of 1GB. Now, we can use these disks to create ASM disk group.


2 : Creating an ASM instance

We need to configure Cluster Synchronization Services.
The Cluster Synchronization Services is required to enable synchronization between ASM and its client database.

2.a- Configuration of CSS ( Cluster Synchronization Servie )

C:\oracle\product\10.2.0\db_2\BIN>localconfig add
Step 1: creating new OCR repository
Successfully accumulated necessary OCR keys.
Creating OCR keys for user 'administrator', privgrp ''..
Operation successful.
Step 2: creating new CSS service
successfully created local CSS service
successfully added CSS to home

C:\oracle\product\10.2.0\db_2\BIN>

When we check services OracleCSService is created and started.

2.b :We need to create a init pfile (init.+ASM.ora) for ASM instance

INSTANCE_TYPE=ASM
DB_UNIQUE_NAME=+ASM
LARGE_POOL_SIZE=8M
ASM_DISKSTRING='D:\asmdisk\*'
_ASM_ALLOW_ONLY_RAW_DISKS=FALSE

2.c : we need to create a password file for ASM instance, and its password is soni.

C:\oracle\product\10.2.0\db_2\BIN>orapwd file=C:\oracle\product\10.2.0\db_2\database\PWD+ASM.ora password=soni

C:\oracle\product\10.2.0\db_2\BIN>

2.d : we need to create Oracle ASM instance

C:\oracle\product\10.2.0\db_2\BIN>oradim -NEW -ASMSID +ASM -STARTMODE auto
Instance created.

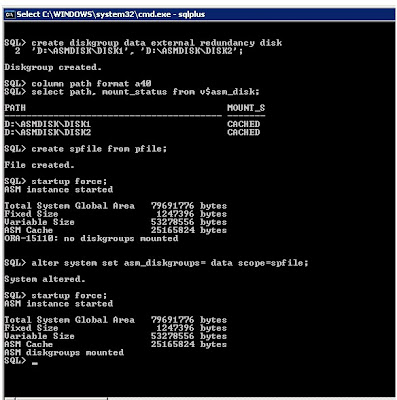
THREE: Creating an ASM disk group.

SQL> select path, mount_status from v$asm_disk;

PATH MOUNT_S
---------------------------------------- -------
D:\ASMDISK\DISK1 CLOSED
D:\ASMDISK\DISK2 CLOSED

SQL> create diskgroup data external redundancy disk
2 'D:\ASMDISK\DISK1', 'D:\ASMDISK\DISK2';

Diskgroup created.

SQL> select path, mount_status from v$asm_disk;

PATH MOUNT_S
---------------------------------------- -------
D:\ASMDISK\DISK1 CACHED
D:\ASMDISK\DISK2 CACHED

SQL> create spfile from pfile;

File created.

SQL> startup force;
ASM instance started

Total System Global Area 79691776 bytes
Fixed Size 1247396 bytes
Variable Size 53278556 bytes
ASM Cache 25165824 bytes
ORA-15110: no diskgroups mounted


SQL> alter system set asm_diskgroups= data scope=spfile;

System altered.

SQL> startup force;
ASM instance started

Total System Global Area 79691776 bytes
Fixed Size 1247396 bytes
Variable Size 53278556 bytes
ASM Cache 25165824 bytes
ASM diskgroups mounted
SQL>


I will use DBCA to create database and specify Automatic Storage management as filesystem.